Hi folks!
As i promised to Miguel Simón, i just made a new version of the Epoch Electrotennis and since the Entex is a clone of this console, i've combined both previous simulators into one. The intro boot screen for both previous sims are now gone so when you start a game, it is in "pause" mode so this gives time to players to be ready before starting a game.
The new sim also boots-up in full screen mode and a new addition is that you can now choose the resolution you want but still depending on the TV or Video Card which resolution it can displays. Please do read the text file which is inside the RAR file.
You can donwload this new version (0.10.1) in the "Simulators" section of the right-side of this blog. Hope you'll like it! =)

Sunday, December 25, 2016
Saturday, December 24, 2016
Merry Christmas to all! =)
First, Merry Christmas to all and a Happy New Year! =)
Holy $%$?! It's been almost 3 months i haven't posted anything here ?! (AArrrgghh!) Time does fly!
I'll try to post something new soon (hoping before 2017...heh!) but in the meantime, here's some new replies to posted comments in the last 3 months:
FrankEBailey posted this comment on December 9,2016:
Hi, sorry if this isn't the right place to ask, but Blogspot is a little unknown to me. Do you know if there's an overlay/underlay for Tomy Tennis that puts in the tennis court and net, and maybe an underlay that puts in the faint inactive LED elements? Thanks!
My reply:
No problem and yes, it is the right place to ask. I was working on an overlay for Tomy Tennis as well as other artwork for the MAME but was busy with jobs and kids so noting has been worked on more than 3 months now.
To for your information, Tomy Tennis is using a VFD display ant not a LED display (an easy error). And here's a screenshot of the Tomy Tennis artwork i was working on (the last time):
 It's almost finished as i need to touch-up a bit the overlay in question. be sure i will upload it when it will be finished. Thanks! =)
- - - - - - - - - -- - - - - - - - - - - - - - - - - - - - - - - - - - -
Ronald Purviance posted this comment on December 13,2016:
Wow, I had one of these things when I was a kid. I had forgotten how loud they were. Thanks for bringing back the memories!
I wonder if Chris is related to me?
My reply:
You're welcome! And reliving memories is "magical" in so many ways. Yes the Mego STPB are very loud so that's why i've modified mine (before selling to a great friend collector) with a volume knob.
Oh and i think you'l be happy to read that i'm working on a Mego STPB simulator (actually 15% done) so that anyone will enjoy reliving their memories or making new ones. It's not coding that's takes a lot of time, it's doing the artwork.
Hummm...good question,you should contact Chris to get your answer!
- - - - - - - - -- - - - - - - - - - - - - - - - - - - - - - - - - - -
So again to you all, have a Merry Xmas and a Happy New Year! =)
--- Sly DC ---
Holy $%$?! It's been almost 3 months i haven't posted anything here ?! (AArrrgghh!) Time does fly!
I'll try to post something new soon (hoping before 2017...heh!) but in the meantime, here's some new replies to posted comments in the last 3 months:
FrankEBailey posted this comment on December 9,2016:
Hi, sorry if this isn't the right place to ask, but Blogspot is a little unknown to me. Do you know if there's an overlay/underlay for Tomy Tennis that puts in the tennis court and net, and maybe an underlay that puts in the faint inactive LED elements? Thanks!
My reply:
No problem and yes, it is the right place to ask. I was working on an overlay for Tomy Tennis as well as other artwork for the MAME but was busy with jobs and kids so noting has been worked on more than 3 months now.
To for your information, Tomy Tennis is using a VFD display ant not a LED display (an easy error). And here's a screenshot of the Tomy Tennis artwork i was working on (the last time):

- - - - - - - - - -- - - - - - - - - - - - - - - - - - - - - - - - - - -
Ronald Purviance posted this comment on December 13,2016:
Wow, I had one of these things when I was a kid. I had forgotten how loud they were. Thanks for bringing back the memories!
I wonder if Chris is related to me?
My reply:
You're welcome! And reliving memories is "magical" in so many ways. Yes the Mego STPB are very loud so that's why i've modified mine (before selling to a great friend collector) with a volume knob.
Oh and i think you'l be happy to read that i'm working on a Mego STPB simulator (actually 15% done) so that anyone will enjoy reliving their memories or making new ones. It's not coding that's takes a lot of time, it's doing the artwork.
Hummm...good question,you should contact Chris to get your answer!
- - - - - - - - -- - - - - - - - - - - - - - - - - - - - - - - - - - -
So again to you all, have a Merry Xmas and a Happy New Year! =)
--- Sly DC ---
Sunday, December 18, 2016
A/V modding a Magnavox Odyssey 400 (and also 100, 200 & 500)
Audio/Video (A/V) modding vintage game console can be easy to hard depending on how the video signal is processed, and for audio, it's usually very easy.
Today is how to make an A/V output from a Magnavox Odyssey 400 (and this also can be done on any Odyssey 100, 200 and 500) as this (and the others Odyssey) is very easy to mod as you don't need any electronic components, just a simple A/V cable (and a soldering iron, etc..).
First, you need to open up the console by turning the only screw in the back and after the back panel removed, you should see this:
 After that, remove the cardboard so it's easier to solder the wires.
 Ok, now find the inscription: "COMP. VIDEO" (it's near the RF section and channel select switch)

 Once you found the "COMP. VIDEO" trace (see yellow line), you can solder a video cable on any of the solder on the (yellow) line and solder the ground cable on the RF shield. (i myself solder the video cable on the last solder point and soldered the ground next to the last solder point - see next 3 pictures). Oh and don't forget to cut the RF cable!


And now for the Audio part, find the PIEZO speaker (upper left - up to the SOUND ON/OFF Switch) and solder the audio cable where the "engraved A (note that it's not there originally)" and the ground beside it - see next 3 pictures):


By soldering to this specific solder point, you can either use the audio out or both audio out and piezo speaker. I put the sound switch to OFF and by doing this, the piezo doesn't "chirp" and the audio out makes a "thund" sound. Now it's up to you if you only want to hear a "thund" sound only or "thund & chirp" sounds (OR...only chirp sound if you unplug the audio out cable).
Now before closing everything up, test your mod and you should get a clean picture (on the TV) like this:
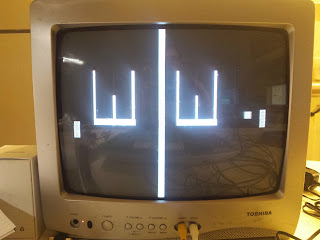

Voila! So now your Odyssey 400 (or 100, 200 or 500) is ready to be played on any recent TV's!
PLEASE NOTE: I'm not responsible to any damage that you may inflict or cause on any game console you (or someone else) by trying to modify, use these information at your own risk.
Today is how to make an A/V output from a Magnavox Odyssey 400 (and this also can be done on any Odyssey 100, 200 and 500) as this (and the others Odyssey) is very easy to mod as you don't need any electronic components, just a simple A/V cable (and a soldering iron, etc..).
First, you need to open up the console by turning the only screw in the back and after the back panel removed, you should see this:


And now for the Audio part, find the PIEZO speaker (upper left - up to the SOUND ON/OFF Switch) and solder the audio cable where the "engraved A (note that it's not there originally)" and the ground beside it - see next 3 pictures):


By soldering to this specific solder point, you can either use the audio out or both audio out and piezo speaker. I put the sound switch to OFF and by doing this, the piezo doesn't "chirp" and the audio out makes a "thund" sound. Now it's up to you if you only want to hear a "thund" sound only or "thund & chirp" sounds (OR...only chirp sound if you unplug the audio out cable).
Now before closing everything up, test your mod and you should get a clean picture (on the TV) like this:


Voila! So now your Odyssey 400 (or 100, 200 or 500) is ready to be played on any recent TV's!
PLEASE NOTE: I'm not responsible to any damage that you may inflict or cause on any game console you (or someone else) by trying to modify, use these information at your own risk.
Tuesday, December 13, 2016
Tandy/Memorex VIS MD-2500 - M.A.M.E. style!
Yep, the VIS is finally emulated in MAME 0.180 and the driver was made by "Carl". OK it's not 100% emulated but at last it's already has a good start as i tried 2-3 ISOs with it and they all worked, even my hack called "VISguard" works nicelly.

And here's a screenshot of the VIS booting screen:

Cool to see this game system finally emulated after some years! Two thumbs up for Carl and everybody who works on all these drivers for MAME! =)
And just in time too as i sold my Tandy VIS to a fellow Canadian collector 2 weeks ago. Oh and i will upload the "VISguard" hack soon if anyone wants to try it out.
= = = = = = = = = = = = = = = = = = = = = = = = = = = = = = = = = = = = = = = = = = = =
Dennys Marques Ferreira posted this message on November 20, 2016:
Ok já enviei seu email para ele espero ansioso pelo primeiro emulador de Telstar Combat!
(In English: Ok I already sent your email to him I look forward to the first Telstar Combat emulator!)
My reply/Minha resposta: Muito obrigado Dennis, mas tem sido cerca de 3 semanas agora e ainda eu não recebi nenhum e-mail de James, talvez ele está muito ocupado.
English: Thanks very much Dennis but it's been about 3 weeks now and still i did not received any email from James, maybe he is very busy.
EOF (for today) ;)
Subscribe to:
Posts (Atom)